The purpose of TCS is to control the PC-TCS
from the host flwo48, a Linux PC, and move the 1.2m
telescope. It manages catalogs and places information from
the telescope and catalogs into the data FITS headers. It also controls
the topbox filter wheel, telescope focus, and through
the guide PC, the autoguider system.
Power for the guider acquisition TV should always be on. You will find
the switch mounted on the mirror cell north
electronics plate.
Make sure the guide PC is up and running.
If you need to reboot the guide PC, type "Ctrl-Alt-Del"
simultaneously on its keyboard. The message "You can start Realtime
system" will appear on the guide PC monitor after various
motors are homed in the topbox (a few minutes).
The only way users should start TCS is by starting the Realtime system.
TCS is an integral part of the Realtime system. It is started
by typing gokep (for Keplercam).
If you attempt to start TCS otherwise, bad things will happen! GETTING STARTED
After you have typed gokep to start up the full system, 3 windows will appear:
These windows all interact. This document will only cover the TCS window. If you have not read the Keplercam primer, you should do so for information on the use and abuse of the other 3 windows. Our discussion from this point assumes you have read this document, and will NOT cover the basics of the other parts.
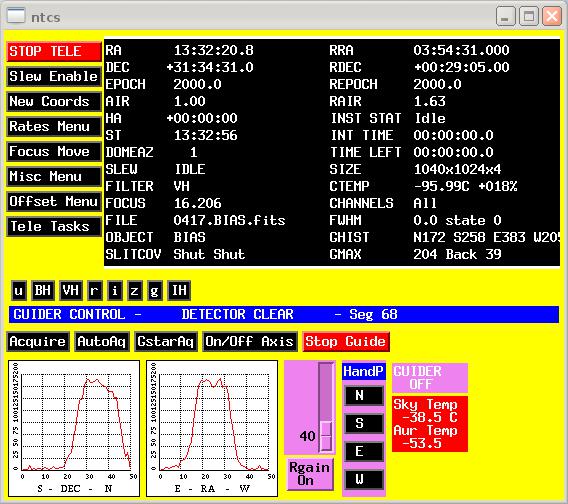
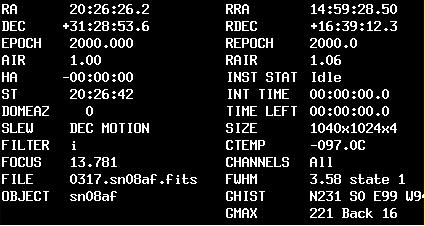
The TCS window contains an
information area that updates
every few seconds; it accepts no input. The information
displayed includes the state of the telescope, topbox and guider:
current and requested coordinates, airmass, HA, ST, Dome azimuth, slew,
focus, filter, and guide FWHM, history of commands (GHIST) and
peak value (GMax). It displays the status of the dome slit and
mirror covers (SLITCOV, either one Shut or Open). Near its bottom, right
it displays the current sky temperature (currently from the
MEarth Boltwood and
our new Aurora units) which shows red (green) for cloudy (clear).
It also displays the state of the instrument: file being written,
object type (e.g., BIAS), CCD status, integration time, time left
for the current exposure, size, program and channel. The last 3 items
(see Keplercam)
can be modified from scripts. If exposures are made manually after
a script finishes, there is no absolute guarantee that it restored
fully these 3 items. Observers should monitor these values before
attempting observations after using a script.
The TCS window also shows a series of buttons.
To select any button place the cursor on the button and depress
the left mouse button. The Buttons, starting at top left, have the following
functions:
At the bottom of the window are buttons for each filter used with the current instrument. There are 8 buttons for the ccd. If you click on one of these buttons, the filter you select is placed in front of the detector.
The section below the filter buttons controls the autoguider, which is covered at the end of this document.
Some of these buttons when selected cause a window with further
choices to appear. This section explores these windows, and
their usage. In most cases these windows were designed to pop-up,
be used, and disappear. For these windows, other windows will not work
until the current pop-up has been dismissed.
If you wish to manually type in coordinates, simply put the cursor anywhere
inside the white line, and type coordinates, for example :
This white line also allows the management of catalogs. When typing into
the white line, three catalog commands are recognized:
Please note that a catalog MUST be loaded before you can retrieve
objects. After manually entering coordinates, or selecting an entry from
a catalog, click on the "OK" button to transmit coordinates to the PC.
In a few seconds, the "Slew Enabled" message will appear on the PC.
at this point you can click on the "Slew Enabled" button, and the telescope
will slew to the coordinates. See the catalog section below for specification
of catalog layout, location, names, etc...
Under this area is a window which displays the loaded catalog, and you may
select an object from this window by right clicking on that line.
When you click the Load Cat button this window appears:
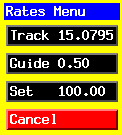
When you click on the Rates Menu button, this window appears :
NOTE: You may also change focus from the
Telshell.
After focusing the telescope, check the on-axis
focus for the guide camera. The default on-axis value may
need to be changed. Note that on-axis is the only
way you should change the guider focus. The guide PC automatically adjusts the
focus values appropriate for each guider segment.
The first two buttons home all stepper motors except the drive motors.
Home Tel Focus homes the motors controlled from flwo48 , Home Guider
homes the topbox pickoff motors.
The Remote TCS toggle button controls the storage of the guide camera
grabbed image file, /Realtime/FLWO48.EXPORT/outfile.fits.gz on
flwo48. This file may be
useful for remote observing if you need a quick
check of your field; it is refreshed every ~10 seconds
when you are NOT guiding. In Cambridge, tdc.cfa.harvard.edu
mounts this directory via NFS at /data/flwo48/FLWO48.EXPORT. Other machines
have mounted it in the past, but only tdc is a sure thing.
Set PC Clock resets the Harvey TCS clock when pressed. Do this if you
have to reboot the mount PC for some reason.
When you click on the Amp Center button, this window appears :
NOTE: you may also change amp centering from the
Telshell.
The CosDec button toggles correction of RA guide pulses for zenith distance.
This will help autoguiding, so leave it ON.
The Track button toggles tracking On/Off.
Dome On/Off controls the dome tracking the telescope.
Home Dome will turn off Dome Tracking and home dome
Dome to Az allows you to enter a new Azimuth for Dome. Turn Dome off
before setting, then back on after setting.
Stow Tele sends the coords to stow the telescope.
Ref Tele (working again) places the telescope at two
sensors and sets the telescope position to the zenith. It is the same
as the "tele ref" telshell command.
Object names must have fewer than 20 characters (fewer is
better). Valid object names comprise letters, numbers and characters from
the set "+-_." ONLY.
Object names must not contain blanks,
since the parser uses blanks as delimiters.
If you use a catalog, the name of your object
will be part of the exposure.
Observers are able to write in the catalog directory;
please do not clobber existing catalogs!
The TV image is grabbed via a frame grabber in the guide PC. The pixel
size is about 0.3 arcsec along both the EW and NS
directions. The format of 640x480 pixels gives a full
field of about 192x144 arcsec (3.2x2.4 arcmin, EW x NS).
The video processor window has clickable "buttons" that allow flipping of each
axis for your viewing convenience. See the 1.2m video processor
instructions for an overview of its capabilities.
The TCS window provides the user with an interface to that guider.
Near the bottom of the TCS window is a box like this
The Acquire button will pull down a window like this:
The button labeled Begin Guide can be pressed once a guide star is
in the
guide monitor. Avoid stars too close to the edges of the monitor. When
Begin Guide is pressed, the guide PC grabs a frame from the
guide camera
and ships it to TCS, which will then create an Xwindow with the grabbed image.
You should then place the flwo48 cursor on the guide star in that Xwindow,
and press the
left mouse button. Guiding will now begin. If your star
disappears (perhaps because of clouds), click inside the window and
then Stop Guide. Avoid killing the window, which may hang TCS.
After a minute or so, the
guider will be stable, and you can begin an exposure. While guiding,
pressing any of the guider buttons will stop guiding, but
it is best to press the Stop Guide button to stop. During guiding the
two graphs at the bottom are periodically updated with
guide-star centroiding profiles (E-W and N-S)
from the guide PC. (Information printed
on the guide monitor is only for debugging.) Adjust the gain lower if
the profiles become flat-topped.
The Guide Focus box allows changing the focus value for the
current segment only. The guide PC adjusts the guider focus as you
change segments, based only on the value set
on-axis. Therefore, if you change the focus value for an off-axis
segment, that value will be ignored as you move to a different
segment. Note that, although guide stars may appear astigmatic as you
change segments, the guider is happy. You need not attempt to
circularize elongated guide star images!
The Move To Seg # box and movement to a known segment number.
The Button labeled AutoAq will move the pickof mirror to Segment 1,
and grab a frame. It will check this frame for a star, and if found, it
will begin guiding on it. If no star occurs in Segment 1, it will step
thru all 69 segments searching for a star. The Stop Guide button
will stop this process.
The button labeled GstarAq finds
a guide star using the Hubble guide star catalog (GSC). GstarAq
depends on the command "tele chipcen" (left over from
4shooter days), which is aliased to "chipcen" for Keplercam.
If you are centered on the center on the array, issue the command
"chipcen 0". If you are centered, e.g., on amp 3, issue the command
"chipcen 3". This will pass on the offset information to the GstarAq
routine. NOTE: when you use "ampcen" to center on a given amp,
the corresponding "chipcen" is issued automatically, so you need
not fret over it.
This routine will search the GSC for guide stars brighter
than 13.0 mag in
the horseshoe, move the pickoff mirror to a segment containing a star
nearest the current segment, grab a frame and
display it on the screen, just like Acquire. If GstarAq finds no stars,
it does nothing.
Left click on the star
in this frame to begin guiding. If no star is visible, click anyway,
and then immediately hit the red Stop Guide button.
Avoid killing the window, which may hang TCS. The most likely
reason for absent stars is that the pointing is off (a 30 arcsec
pointing error will do it). Another may be bad seeing or cirrus, if
the only stars available are nearly as faint as the 13 mag limit.
The status window labeled "Kep.err" (which opens by default in the lower-left
corner of the monitor where you typed gokep)
shows the list of all stars it found.
Near the bottom of this window, you should be able to
find (you may need to scroll) something like this:
The Button labeled On/Off Axis toggles the pickof mirror
between Segment 0 (On-Axis) and Segment 1.
The Stop button, mentioned above, is used to stop guiding.
It won't hurt
if pressed when not guiding.
Under the Stop Guide button is a slider widget, which is the gain
control for the guide camera, meant for remote observing. It starts
with Rgain at Off (or On but a low gain at 40). The slider is less
reponsive than the knob; only use it remotely. You must first click
the Rgain button, which will toggle gain on, then you may use the
slider to control gain. If you turn the gain too high it can freeze
the autoguider; make sure to raise the gain slowly.
Next to the gain control is a hand paddle interface, primarily for use
remotely. This is a digital hand paddle, not analog, meaning
that pressing down the N button and releasing it will produce a 1 second
pulse at the current guide rate in the North direction. If the rate is set
at .5 seconds, two clicks should approximate one arc second.
NEW COORDS
When you click on NEW COORDS the above window appears for selection
of the next telescope position desired, either manually or via catalog
management commands. The single white line can be used to display the
last coordinates entered from this menu by using the up-arrow key.
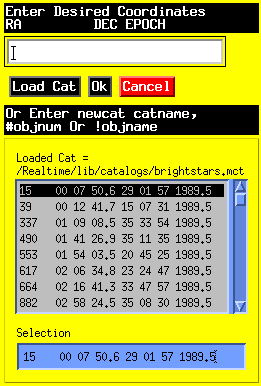
   12:12:12 32:00:01 1950.0 or
   12 12 12 32 00 01 1950.0
Spaces are used to separate the fields RA, DEC, and EPOCH, spaces or
colons may be used as internal field separators. A control-K
entered on this line deletes from the cursor to the end of the line,
and the delete key deletes the character prior to the cursor.
The epoch field is optional, but Ra and Dec MUST BOTH be entered!
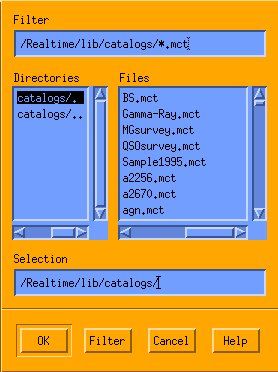
You can change the entry under Filter and then click the Filter button
to change directories; selecting any listed catalog file loads
that catalog.
RATES MENU
LOADING FILTERS
Filters must only be loaded by staff.
Please make arrangements in advance if your schedule requires
a weekend arrival at Mt. Hopkins. It may be neccesary to ship your filters
ahead. Filters are normally changed Monday-Friday between 9:15AM and
4:15PM. Note which slot in the wheel each filter is inserted into,
as that information will have to be entered by staff into a file
used to label the filter button upon startup.
MOVING FILTERS
To move to a particular filter, simply click the left mouse button
on the appropriate pad. The longest time required to change
a filter is ~15 seconds (4 positions). The filter currently
on axis is displayed in the TCS window filter position. If you open
the west door to the topbox, the filter two before the on-axis filter
should be visible. So, if you select the first filter, filter 3 should
show thru the open door. If this does not happen, exit the Realtime
System, and then restart the Realtime system. If UPS power is lost during
a run, exit the Realtime System AND reset the guider, cycle the power
to the controllers, and restart Realtime System.
TELESCOPE FOCUS
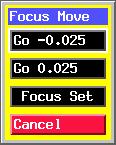
When you click on the Focus Move button, this window appears :
The focusing mechanism is part of the hexapod, which receives commands
from flwo48 (a Linux PC) via the TCS window to move the secondary
mirror in or out. Lower numbers mean the secondary moves toward the
primary. The units are mm.
The default size of 0.025 units corresponds to the smallest significant
change in the secondary position when binned by two with the ccd.
The size of the movement can be changed with the Focus Set
button. The current focus position is displayed in the main TCS info window.
MISC MENU
When you click on the Misc Menu button, this window appears :
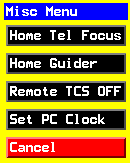
To view the file, use the following procedure. First, make sure
that the remote observer at the 1.5m has turned on the guide
camera and turned up the gain on the guide camera. Then, follow the
rest of the remote observing instructions
here.
OFFSETTING
When you click on the Offset Menu button, this window appears :
"Load New Offset File" prompts for a file
of offset positions. To apply catalog offsets,
select "Send Next Cat Off".
For manual offsets, use the small window to type in the offsets,
and then select "Send Manual Off". The telescope will then
move (no slew enabling needed).
The slew enable button duplicates the slew
enable button in the main window (not needed here).
See section below on Offset Catalogs for more information.
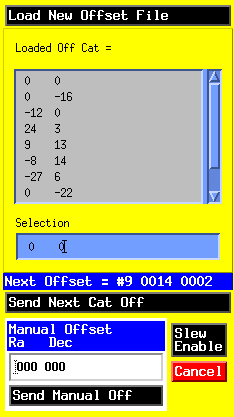
NOTES:
(1) offsets are in arcsec;
(2) offsets are CUMULATIVE;
(3) there is a new, preferred method to center your
observations on a given amplifier, using the
TCS command "Amp Center" as described below.
TELE TASKS
When you click on the Tele tasks button, this window appears :
If you click on Set TelePos, you are presented with a small widget
containing the last coordinates to which the telescope was slewed.
Clicking on "OK" in this widget will reset the telescope coordinates
to the values shown therein.
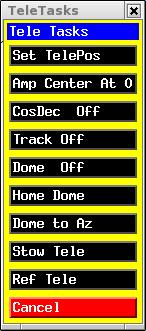
The top entry is only a display that
shows the current amp center (also shown in the Tele Tasks
window). This label is updated only after you cancel out of the menu
and bring it back up (similarly for the Tele Tasks menu).
Clicking on AmpX where X=1,2,3,4 centers the pointing on amp X. Center
puts the pointing at the center of the chip. You can also enter arbitrary
moves in arcsec in the white window, and then click on "Manual Amp Move"
to apply them. Close the window by clicking on Cancel.
If the telescope is tracking, this command moves the telescope to
amp X immediately after you click on AmpX.
AmpX centering is persistent
under slews, unlike offsets, which disappear after a slew. However,
it disappears if you exit the system. 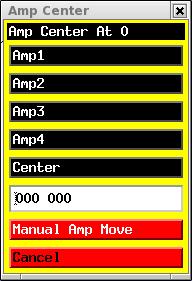
INFO WINDOW
The rest of the main window contains the info window, which show the
current values of telscope position, time, focus setting, etc. This
window updates about every two seconds :
CATALOGS AND TCS
Catalogs are of two types, object catalogs, and offset catalogs.
All catalogs must be stored in the directory /Realtime/lib/catalogs.
OBJECT CATALOGS
Object catalogs have the following format:
!P.I.: Falco
!Program: Lenses
SDSS1004  10:04:34.8  +41:12:40   2000.0   0.00 0.00
SDSS1029  10:29:13.35 +26:23:31.8 2000.0   0.00 0.00
The first two lines specify the P.I. and Program for the catalog.
If these lines are in the file, the information therein
will be placed in the headers of all objects selected from
this catalog. Subsequent lines have 4 fields (6 if proper motion is
needed). The first field is the object
name, the second field is RA, the third field is DEC,
and the fourth is the epoch.
Two additional, optional fields are for proper motion (PM) in RA and DEC
in that order. The DEC PM is in arcsec/century and RA PM
in (sec of time)/century. To convert the change
in RA to arcsec per century, multiply by 15*cos(DEC).
After the 4 or 6 fields, never pad with spaces.
For example, if you load the catalog above and select
the first entry, SDSS1004, typing "total 10" at the command window
will produce a 10-second exposure and store it in a file
"NNNN.SDSS1004.fits" (NNNN is the file sequence number).
You can override the object name by giving the "object"
command thus: "object MYNAME; total 10", which will
produce a 10-second exposure and store it in a file "NNNN.MYNAME.fits."
The name will also be stored in the FITS header, assigned to keyword OBJECT.
OFFSET CATALOGS
Offset catalogs have the following format, illustrated from
the file /Realtime/lib/catalogs/foc.off:
          24 0
          24 0
          24 0
          24 0
          24 0
          LINK
The first field is R.A. offset value in arc seconds, the second is
DEC. in arc seconds. Both fields may have values between -500
and 500. The last line in the file is LINK, which is
optional. If LINK occurs as the last line in the file, tcs
will cycle through this file forever, restarting with the
first line after te last line. If LINK does not occur, tcs
will tell you to reload a new offset catalog after the last
line.
GUIDER FUNCTIONS
The autoguider is a Linux-based system.
Note that the autoguider works best when the TV background is low.
Thus, if the sky background is high (e.g., when observing near
the moon), turn the TV gain down to minimize this background.
At the top of the box is a label that shows the detector status, (Blocked.
Clear or Guiding) and the current segment for the pickoff mirror.
This is followed by several command buttons. 
The button labeled Move to Next Segment will cause the pickoff mirror to
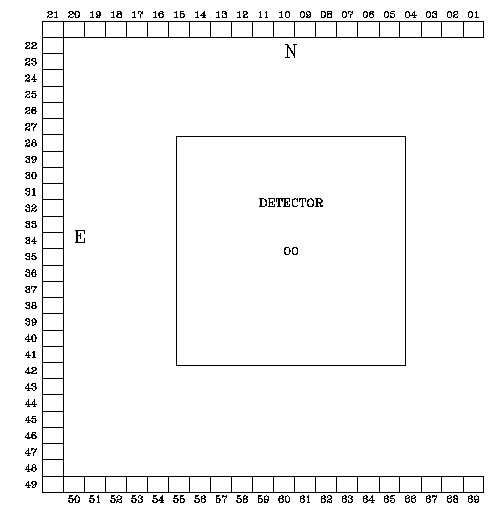
move to the next segment in the horseshoe, shown here.
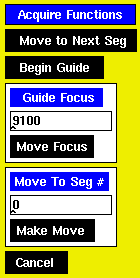
Move to
the next segment until a guide star is visible on the guide camera
monitor.
/home/falco/guide/doguide 11 12:27:02.0 +31:29:41.1 3 0 0 > /tmp/autofind
  8  11.91  47.2     3    90   291
  7  11.31  32.8     4   146   179
  3  10.52  39.3     8   175    85
  1  12.82  46.0    10   249    20
 24   9.45   5.7    13   269   240
The first column is the segment number, the second one the V magnitude
of the star. If you are unhappy with the star that
GstarAq selected, you can pick any other from that list, move to its
segment, and start guiding as described above.