
The basic purpose of TCS is to control the DFM Macintosh from
host flwo48, a Sun Sparc10, and move the 48" telescope. It will also
manage catalogs, and place information from the telescope and catalogs in
data file headers. It also controls the top box filter wheel, and through
a PC, the autoguider guider system.
The power to the acquisition TV should be on. You will find the switch
mounted on the mirror cell.
Make sure the guide PC is booted first (the monitor & keyboard are located on
a stand to the right of the Sun monitor; the computer itself is
under the table). Usually, a message like "IN parent..."
is visible on the PC monitor. If you need to boot the PC computer, type "Ctrl-Alt-Del"
simultaneously.
The only way users should start TCS is by starting the Realtime system.
TCS is a integral part of the Realtime system, and it is started
automatically whenever you type either gonccd or gonsonic.
If you attempt to start TCS independently, bad things will happen!
So, depending on which instrument you are using, type either gonccd
or gonsonic. GETTING STARTED
These windows all interreact. This document will only cover the TCS window. If you have not read the Primer for 48" Telescope Users, you should read it for information on the use and abuse of the other three windows. Our discussion from this point assumes you have read this document, and will NOT cover the basics of the other parts.
The TCS window will display a series of buttons and a list of information. The information area will update every few seconds, and will accept no input. To select any button place the cursor on the button and depress the left mouse button. The Buttons, starting at top left, have the following functions:
At the bottom of the window are buttons for each filter used with the current instrument. There will be 8 buttons for the ccd and 18 buttons for the irarray. If you click on one of these buttons, the filter you select will be placed in front of the instrument.
There is a section below the filter buttons that deals with control of the autoguider. This will be coverer at the end of this document.
Some of these buttons when selected will cause a window with further
choices to appear. This section will explore these windows, and
their usage. In most cases these windows were designed to pop-up,
be used, and disappear. For these windows, other windows will not work
until the current pop-up has been dismissed.
If you wish to manually type in coordinates, simply put the cursor anywhere
inside the white line, and type coordinates, for example :
This window also allows the management of catalogs. When typing into
the white line, three catalog commands are recognized:
Please note that a catalog MUST be loaded before you can retrieve
objects. After manually entering coordinates, or selecting an entry from
a catalog, click on the "OK" button to transmit coordinates to the Mac.
In a few seconds, the "Slew Enabled" message will appear on the Mac.
at this point you can click on the "Slew Enabled" button, and the telescope
will slew to the coordinates. See the catalog section below for specification
of catalog layout, location, names, etc...
When you click on the Rates Menu button, this window appears :
The CosDec button toggles correction of RA guie pulses for zenith distance.
This will help autoguiding, so leave it ON.
Dome On/Off controls the dome tracking the telescope. This has no effect
if the AutoDome switch on Mac is off.
Set Dome Az allows you to enter a new Azimuth for Dome. Turn Dome off
before setting, then back on after setting.
Stow Tele will send the coords to stow the telescope. After pressing this
set track rates to 0.0 using tcs, or turn track off on Mac rack, then
hit slew enable to stow telescope.
The Button labeled On/Off Axis will toggle the pickof mirror between Segment
0 (On-Axis) and Segment 1.
The Acquire button will pull down a window like this
The button labeled Begin Guide can be pressed once a guide star is
in the
guide monitor. Don't use a star too near the edge of monitor. When
begin guide is pressed, the Linux PC will grab a frame from the guide camera,
ship it to TCS, which will then create an Xwindow with the grabbed image.
You should then place the mouse cursor on the guide star in the Xwindow,
and press the
left mouse button. Guiding will now begin. After a minute or so, the
guider will be stable, and you can begin an exposure. While guiding,
pressing any of the guider buttons will result in guiding stopping, but
it is best to press the Stop Guide button to stop. During guiding the
two graphs at the bottom will periodically be updated with information
from the centroid running on the Linux PC. Information will also be shown
on the Linux monitor, but it's only for debugging.
The other two boxes in the Acquire menu allow changing of the focus
for that segment only (see next paragraph),
and movement to a known segment number.
The Params button will produce a menu that allows changing the number of
frames summed, and a change of the
guide TV on-axis focus. All off-axis focus settings are produced using the value
for on-axis focus. So, after focus of telescope, check the on-axis guider
focus. If it is incorrect, adjust it here. Changing the focus in one
of the off-axis segments by using the "Guide Focus" button will not affect the on-axis focus . As
as consequence, focusing in one segment will not insure that the next
segment will be in focus, or the same segment for that matter if you return
to it after moving to the center, for instance. The correct procedure to
insure improved focus is
to change the on-axis focus by the same amount that you have changed the
focus in that particular segment.
The Stop button, mentioned above, is used to stop guiding. It won't hurt
if pressed when not guiding.
Under the Stop Guide button is a hand paddle interface, primarily for use
during remote observing. This is a digital hand paddle, not analog, meaning
the pressing down the N button and releasing it will produce a 1 second
pulse at the current guide rate in the North direction. If rate is set
at .5 seconds, two clicks should approximate one arc second. This will not
be exact due to errors in Mac seeing button held down.
Finally, there is a gain control for the guider camera, which is also meant
for remote observing (not yet functional.
This section of the Realtime System is still under construction, with many
additions planned shortly.
NEW COORDS
When you click on NEW COORDS the above window appears for selection
of the next telescope position desired, either manually or via catalog
management commands. The single white line can be used to display the
last coordinates entered from this menu by using the up-arrow key.

   12:12:12 32:00:01 1950.0 or
   12 12 12 32 00 01 1950.0
Spaces are used to separate the fields RA, DEC, and EPOCH, spaces or
colons may be used as internal field separators. A control-K
entered on this line will delete from the cursor to the end of the line,
and the delete key will delete the character prior to the cursor.
The epoch field is optional, but Ra and Dec MUST BOTH be entered!
RATES MENU

LOADING FILTERS
Filters must only be loaded by Bas, Ted Nelson, or other qualified
people. Please make arrangements in advance if your schedule requires
a weekend arrival at Mt. Hopkins. It may be neccesary to ship your filters
ahead. Filters are normally changed Mondfay-Friday between 9:15AM and
4:15PM. Note which slot in the wheel each filter is inserted into,
as that information will have to be entered into a file by Bas or Ted which
is used to label the filter button upon startup.
MOVING FILTERS
To move to a particular filter, simply click the left mouse button
on the appropriate pad. The longest time required to change
a filter is ~15 seconds (4 positions). The filter currently
on axis is displayed in the TCS window filter position. If you open
the west door to the topbox, the filter two before the on-axis filter
should be visible. So, if you select the first filter, filter 3 should
show thru the open door. If this does not happen, exit the Realtime
System, and then restart the Realtime system. If power is lost during
a run, exit the Realtime System AND the guider, cycle the power
to the controllers, and restart Realtime System.
TELESCOPE FOCUS
When you click on the Focus Move button, this window appears :
The focusing mechanism uses a stepper motor controlled
from the Sun computer via the TCS window to move the secondary
mirror up or down. Lower numbers mean the mirror moves toward the
primary. The size of the movement can be changed with the Focus Set
button. The default step of 20 corresponds to the smallest significant
change in the mirror position when binned by two with the ccd.
The current focus position is displayed in the main TCS info window.
After focusing the telescope, be sure to check the on-axis
focus for the guide camera. The default on-axis value may
need to be changed. See below.

OFFSET MENU
When you click on the Offset Menu button, this window appears :
If you click on Load New Offset File, you will be prompted for a file
of offset positions. This window includes buttons to select and load
new offset catalogs, a small window to type manual offsets into,
a button to take the next catalog offset, a button to take a manual
offset, and a slew enable button that duplicates the slew
enable button in the main window.
See section below on Offset Catalogs for more information.

TELE TASKS
When you click on the Tele tasks button, this window appears :
If you click on Set Tele Pos, you will be presented with a small widget
for correct telescope coordinates. This contains last coordinates of slew.

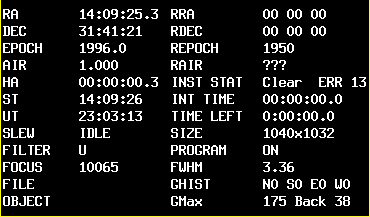
INFO WINDOW
The rest of the main window contains the two info windows, which show the
current values of telscope position, time, focus setting, etc. These
windows update around every two seconds :
CATALOGS AND TCS
Catalogs are of two types, object catalogs, and offset catalogs.
All catalogs should be stored in the directory /Realtime/lib/catalogs.
OBJECT CATALOGS
Object catalogs have the following format, illustrated from
the file rudy.mct:
     !P.I.: Rudy
     !Program: Periodicity
     TWQSO         09:57:57.3  56:08:23  1950.0
     3c351         17:04:03.0  60:48:31  1950.0
     ot546         17:27:04.0  50:15:31  1950.0
     4c34          17:21:32.0  34:20:00  1950.0
The first two lines specify The P.I. and Program for the catalog.
If these lines are in the file, the information from these two
lines will be placed in the headers of all objects selected from
this catalog. Subsequent lines have four fields. The first field describes
object name, the second file is the entry for R.A, the third
field is DEC, and the last field is epoch. Currently this
system will not use proper motion! After the listed fields,
do not pad with spaces. Object names must not contain embedded blanks,
since the program uses blanks as delimiters. Use of dashes
or minuses and plus marks in object names will confuse IRAF, and
should be avoided. All users should be able to write in catalog directory, please
do not clobber existing catalogs!
OFFSET CATALOGS
Offset catalogs have the following format, illustrated from
the file /Realtime/lib/catalogs/foc.off:
          24 0
          24 0
          24 0
          24 0
          24 0
          LINK
The first field is R.A. offset value in seconds, the second is
DEC. in seconds. Both fields may have values between -500
and 500. The last line in the file is LINK, which is
optional. If LINK occurs as the last line in the file, tcs
will cycle through this file forever, restarting with the
first line after te last line. If LINK does not occur, tcs
will tell you to reload a new offset catalog after the last
line.
GUIDER FUNCTIONS
On May 17th, 1995, the new Linux based autoguider became functional.
The TCS window provides the user with an interface to that guider.
Near the bottom of the TCS window is a box like this
At the top of the box is a label that shows The detector status, (Blocked or
Clear or Guiding) and the current segment that the pickoff mirror occupies.
This is followed by several command buttons. The AutoAq button is not
yet functional, although it causes no harm if pressed.
The button labeled Move to Next Segment will cause the pickoff mirror to
move to the next segment in the horseshoe. For a look at the horseshoe,
click here Topbox Horseshoe. Move to
the next segment until a guide star is visible thru the guide camera
monitor.
