At this point, you need to learn how to use the mouse. It has 3
buttons: left, middle and right.
The mouse serves many functions, only a few of which will be
described here.
The location of the mouse brings focus, i.e. directs keyboard characters to the
appropriate window. You simply place the mouse cursor
(looks like a capital I) on the window you want to work in. Often, if
nothing happened after you typed a command, it was because the mouse
was not in the right window. A simple action you can achieve is
to click with the left button
on a window just about anywhere on it, except on the little
boxes at top right: that brings it to the foreground. Other actions,
such as clicking, dragging to select, and inserting, are standard X.
At the top margin of each window is a bar; clicking a mouse button there
results in one of these actions:
Normally, all 4 CCDs are read out. If you are interested in only
one of the chips, say chip 3, you should issue the command "ccd selchan 3" and
to return to normal "ccd selchan" (the
default). You only save disk space this way, not
readout time unfortunately. If in doubt, typing "ccd selchan ?" in
the rtshell will return the status, 0 being the default, all 4 CCDs.
Click here for more info on the CCD Chip
-
You may also want to change the number of channels that are read out. You
can choose between 4 and 8 channels. split will result in 8 channels
(2 per chip), while nosplit results in 4 channels (1 per chip).
You are strongly DISCOURAGED to use split , see the staff if you
have any questions.
The frames are stored in a directory named like
/4sh/flwo2/year/month/day, for example /4sh/flwo2/2000/01/03 for
2000 Jan 3.
The directory changes at noon MST.
Data are stored in FITS EXTENSION files, so
a command has been issued as ccd filetype extfits in the rtshell
(do not change under any circumstance!).
There are thankfully only a few commands you need to know to take an exposure:
- obs
- Prompts for a title, and an exposure time (in seconds or sexagesimal
(mm:ss)). Will do a fast clear of the CCD, open the shutter, read out the
CCD and store the data. Information contained in the comment block is
automatically store in the data header.
- total n
- Will do a fast clear of the CCD, open the shutter for time n,
where n can be seconds, or sexagismal (mm:ss), read out the CCD
and store the data. No prompt will be made for comments - you must enter
a name via "object" or "comments," otherwise file is named "unnamed".
Total can not
be used to change the exposure time in the middle of one already in
progress. There is currently no way to change an exposure time for
an exposure in progress, except by executing stop, and dstore ,
which will store the exposure as is (also, see kill command below).
- bias n
- Takes n zero-second exposures and names them ``BIAS''.
- godark [ n ]
- Same as total except the shutter isn't opened. The exposure
is named ``DARK''.
- goflat [ n ]
- Takes an exposure of length n, calls it ``Flat'', and
notes in the header that the exposure is a calibration flat field.
- mtotal m
- Like total, but for integer minute exposures.
- go [ n ]
- Does a fast camera clear, open the shutter for optional time n,
or forever with no time. A total time may later be entered via the
total n command. The shutter will close at the end of time,
No storage occurs, so this works for multiple exposure frames.
- stop
- Stops the current exposure; no readout.
- dstore
- Reads out the CCD and stores the image on disk. The comment
field must have been edited.
- repeat [ m ]
- Repeats the last command m times. To take m+1
exposures, use the sequence total n; repeat m, all
on one line. A more frequently used sequence might be
goflat 6; repeat 24 to obtain 25 flat fields.
The comment field should be edited beforehand,
or fresh should be used. To end a sequence, type ccd norepeat.
- abort
- Kills an exposure, but does not clear the CCD.
- kill or sac (stop+abort+clear)
- Kills an exposure, clears the CCD. No readout.
- clear
- Resets status, often needed after an abort.
- cc [ n ]
- clears the camera (fast read) n times.
- comment
- puts you in the comment editor. If a change is
made, the comment block is stored as comments in the disk fits header,
and object goes into the fits keyword OBJECT.
- fresh
- uses the most recent comments for the next image
- object name
- gives the next file a name, puts that name
in the FITS keyword OBJECT, but does not put that name in the comment
field, nor does the comment field get stored in the next file, unless
the comment command is also explicitly invoked.
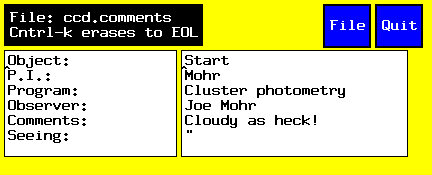
Comment Editor
The comment block can be edited by typing the command comment.
Here's how the comment-editing window appears:
When the window appears, move the cursor to the right side of the window
where the changeable parameters are. On the 1.2m, the coordinates, airmass,
times and filter are transferred from the telescope computer, so the only
things you might want to enter are the object name, your name
and the weather conditions.
The stored frame will use the object name as a name, if one has been
provided via the comment block, the command object, or by using
the command obs. An object name will also be entered into the
frame header if the catalog option in the TCS window has been invoked
(see below and the TCS manual). If neither
option has been chosen, the frame will be named unnamed, and
the comment field in the header will be blank. The obs command
automatically stores the comment block, even if it hasn't been edited
recently.
Telescope and Top Box Control
The TCS window allows control of the movement of the telescope, telescope
focus, top box filter wheel and guider functions. It also displays the
current telescope position, focus and filter position, and telescope times
if the PC communication is on (set by clicking on the PC Comm button).
For a more detailed listing of the use of this window, see the
TCS manual . Here is a sample TCS window:

- Filters
- Filters can only be loaded by Wayne, Ted, Bob or other qualified people.
To move to a particular filter, simply click the left mouse button on that
filter button. The longest time required move to a filter is 15 seconds,
for a 4 position move. The filter currently over detector is displayed in
the TCS window. You should blow the dust off the filters using a canister
of dry air before your run begins, or perhaps even every afternoon. There
is an access port that makes this easy.
We have UBVRI, Sloan and narrow-band
filters. Note that
2" filters will vignette at the edges of the CCD field, in a curious
way that causes astigmatic star images. NOT recommended with 4shooter.
- Telescope Focus
- Telescope focus uses the hexapod under control of the TCS program
on the Sun computer (flwo48).
To change the focus manually, click the left mouse button on the
TCS Focus Move button. A smaller window will pop up with buttons for
movement in or out. The movement step size can be changed with the Focus Set
button. Movement to larger numbers is against gravity. The focus
position is displayed in the TCS window, and is stored in the data header.
- To actually measure and set the focus,
please try the findfwhm script.
This script is fully automatic; it
estimates the focus and sets it, estimates the seeing, and records its
results along with mirror temperatures in a file we are using to
monitor the seeing. If you prefer to use the old methods to focus,
click here.
The telescope focus shows changes with position in an erratic way, and
with outside air temperature, in a more uniform way. After slewing
through large
angles, the focus may change, but not always. If you are observing
a single object for a long time, you will notice the focus position
increase as the temperature drops during the night.
- Slewing
- Use the TCS New Coords button to enter your next position, using
spaces or colons to separate h:m:s and d:m:s. The epoch
may be omitted, in which case 1950.0 will be used. The coordinates may also
be selected from a catalog (see the TCS manual). Once
coordinates are loaded, then click on the Slew Enable button. The
STOP button will abort a move or a new coords command, but hitting
the cancel button on the DFM rack is faster.
- Other Features:
- One can also offset the telescope from the present position an arbitrary
number of arcsecs, change the track rates, set the time, and basically do
all of the TCS functions from the rtshell window as well as the TCS window
via special commands. See the TCS manual) for details.
Rtshell also allows script control of the system, see the
Rtshell Users Guide and the
Rtshell Script Writers Bible for further
information.
Telescope Focusing (old style)
If your roots are very deep, follow the old method and
take manual focus frames thusly:
- Determine the appropriate exposure time for a star in your
favorite field and place
the star in the middle of the CCD. Make sure the star is NOT
one of the entries in the bright star catalog!
- Move the focus 60 units lower than the suspected true focus.
Please visit the HEXAPOD description.
- In the Rtshell window, type
go n, where n is the exposure time.
- After the beep, offset the telescope about 15" west, and move the focus
up about 20 units.
- type go n again.
repeat 3 & 4 about six times, leave a double offset for the last
exposure.
- for the last exposure type total m*n, where m*n
is the total
exposure you expect (the TCS will tell you this). If you
don't want any more exposures, make m*n equal or less than the current
exposure time.
- The chip will now be read out. You have created multiple exposures
of the star at different focus settings, which can be inspected via the
imexamine routine for the best focus.
You might also use a script called testfoc which takes 3 arguments,
numframes, exptime and stepsize. For example, testfoc 8 2 15
will produce a frame name 0002.FineFoc.fits which contains eight
exposures of two seconds each, with a focus offset of 15 steps between
each frame, and will then prompt the user for the number of the in-focus
image and set the focus to the correct value. The command nfoc
is equivalent to testfoc 8 2 15.
The telescope focus shows changes with outside air temperature in a
fairly uniform way. After slewing to extreme hour angles, the focus
may also change. If you see unusual changes in focus values, please
report that in detail, in the nightly logs.
Once you've tried the old way, please try using findfwhm to measure and set the focus. This
script is fully automatic, estimates the focus, sets it, estimates the
seeing, and records its results along with mirror temperatures to a
file we are using to monitor the seeing.
Guider Focusing
After focusing the telescope, put the guider on-axis, then in the
guider's
acquire window adjust the focus value. The guider will remember ANY
change to guider focus while on-axis, and store this for use in the
future. If the telescope focus was correctly set, you only need to change
the on-axis guider focus once. When the telescope comes out of focus,
just refocus the telescope, and the guider will be back to focus.
Scripts
The rtshell allows many manual commands to be automated. For instance,
scripts have been written that will execute a sequence of commands
that will take flat field exposures in various filters. Likewise, scripts
can be written to move to a standard star and take exposures in several
filters. Check the scripts subdirectory in the 4obs directory for
sample scripts. For details on writing your own scripts, go to the
Rtshell Script Writers Bible for further
information.
It is not easy to kill a script, for the shell is occupied during the
script and will not accept commands like "kill". Typing CNTRL-C during
readout will sometimes kill each exposure individually, and thus is
useful if there are only a few exposures left. Otherwise, you must kill
the rtshell window (using the 3rd mouse button to bring up "Destroy
Window"), and then restart the Realtime system. This problem may be avoided
by putting in 5 second delays between each sequenced exposure in the
script used, during which
time one can type a CNTRL-C which will kill the sequence. The sample scripts
listed here have such a feature.
Twilight flats
The script dotwilight.script allows
you to create sky flats automatically. The script determines
the date of observation and calculates the appropriate exposure times,
given the readout time of the 4shooter. It also determines which filter
is in place, and uses it to expose. Follow the link above for a detailed
explanation and instructions.
Data Archiving
You can either create a fits tape using iraf, or use unix tar in the
data directory. The csh command backup is a user friendly version
of tar.
- To use IRAF:
- To write to a new DAT tape use mscwfits *.fits mta newtape+
- To write on a tape containing files use mscwfits *.fits mta newtape-
Purging Files
Eventually, you will need to remove your files from disk, either because
you are running out of room, or your run is over. To check the data disk
space, in the login window type df /4sh
(/4sh is linked to /data/ccd/4shooter), which will produce the output:
Filesystem            kbytes    used   avail capacity  Mounted on
/dev/dsk/c0t2d0s2    8749013 4167071 4494452    49%    /data
and note the space available on the data disk, about 4.5 gigabytes
in this example.
The Iraf command to delete files is imdelete. You can use it for IRAF
or FITS files. You may wish to edit the parameter file for imdelete
(via epar imdelete) to turn on the safety measures.
You can
also use delete for fits files. Unix rm can also be used, as can rmdir.
Your data will be subject to deletion the afternoon following your
last night of observing. However, if there is ample space to start
your run, you might consider postponing such deletion until it becomes
necessary (especially on weekends). You may want to check the data
disk to see what garbage is left over from the previous observer.
Exiting (gracefully and otherwise)
You don't have to logout, but if you want to, first kill the Realtime
system.
Type exit twice in the Rtshell window, or use the alias bye. The
windows will go away after a while.
If you accidentally get out of the Realtime system (by typing a lot of
CTRL-C's for instance), you can re-enter by typing go4 .
in the login window, which is the official way to bring up the system.
After exiting Realtime system, you can exit the computer by typing
exit in the Main Login window
Problems
If the CCDs are slow or unresponsive, click here
for instructions to recover.
If tcs becomes unresponsive on flwo48, click here
for instructions to recover.
If you get into bad trouble, for example the screen locks up on
you and you get no response for several minutes, you will have to
reboot the system. You may also have to do this to restart
after being shutdown because of maintenance work or power problems.
There are three possible ways to reboot:
- If you can still type commands into some window somewhere (ON FLWO48!)
, type godown -r, which is a link into shutdown, and will flush all
disk buffers to disk and shutdown as gracefully as possible. If the
computer has been crashing on its own, you may want to power down the
computer at this point (in the computer room), to reset various modules.
- On the Sun console keyboard, press the `Stop' key in the upper left
corner (also marked `L1') while simultaneously pressing the `a' key. This is
also called `pressing L1/A' in some documentation. Possible file system
corruption may occur, as disk buffers are NOT flushed.
- Turn the power off on flwo48, wait 5 seconds, then back on. The
power switch is located on the back of flwo48's pizza
box. Possible file system corruption may occur, as disk buffers
are NOT flushed.
The number 1 method should always be attempted first, but if it won't work
try 2, then 3.
After shutting down the machine via either of the first 2 methods, you
reboot by typing a `b' at the `<' prompt. In the
third case, the computer should reboot automatically without user
intervention.
Within a few minutes, after a lot of messages, the login window should be back.
Useful UNIX Commands
(aliases are put in parentheses) (arguments inside [] are optional)
  ls -l[dirname]    (dir)   - lists the contents of a directory
  rm file          (del)   - deletes file
  mv file1 file2             - renames file1 to file2
  cp file1 file2              - copies file1 into file2
  cat file                  - lists the contents of a file
  lpr filename              - prints file named filename
  xterm &                 - creates another window
  vi[filename]             - an editor
  emacs[filename]          - another editor
  cd directory             - change to directory directory
  mail                   - To read your mail
  mail name[@host.domain]  - To send mail to user
  ssh [user@hostname]        - Connect securely to hostname
  sftp [user@hostname]     - secure file transfer program
Unix device names:
- 4mm DAT tape drive - /dev/rst5
- DLT tape drive - /dev/rst29
- Postscript Laser printer - lp
Unix commands can be executed in the Rtshell window,
but in general it is better to execute them in the login or other
windows.
It is wise not to use the login window for remote logins or
transfers via ssh or sftp.
Using IRAF
Once you have taken an image, move over to the IRAF window
to look at the data. In that window, type cd; cl as usual. You
will need to cd to the data directory, for example
cd /4sh/flwo2/2003/01/03. Type dimtool for ds9,
*the preferred display method*,
simtool or ximtool, then
type flwo48:0.0 (flwo48:0.1) at the IRAF prompt to display on
the right (left) monitor. If you are displaying unbinned images,
you will need to change the stdimage in IRAF: type
set stdimage=imt2048 to view your full images.
If you want to use the left monitor to display images,
there are a few tricks. To use saoimage (ds9), type simtool
(dimtool) as above, but type flwo48:0.1 to the IRAF prompt. This will
place the saoimage (ds9) window on the left monitor. To use ximtool,
you must find an xterm in the left monitor (to open an xterm, move
the cursor there, and click on the left button). Start up IRAF, type
ximtool, and answer flwo48:0.1 to the prompt. You can now display
images from either that IRAF window, or one on the right monitor.
Use mscdisplay (in the mscred package)
to display images (ex. mscdispl 0004.M31 1);
mscexamine to examine them (like imexamine but for
mosaics). Caveat: although mscexamine
appears to work to some degree, imexamine on individual frames (see
below for an example) is the only reliable approach.
Make sure you have set
stdimage=imt1024. Other mosaic commands can be found in the package
"mscred" (loaded at startup). Warning. A "feature" of the mscred
package is that coords are always in detector units, in this case one
unbinned pixel. So, if you take binned data, and use mscdisplay or
mscexamine, the pixel values shown in your imtool (saoimage, ximtool
etc) and in your fwhm as gotten from radial profile fits will seem to
be twice as big as they should be.
Single frames can be displayed thus: "display 0001.M31[1] 1", for example.
This method
is sometimes more useful since the coordinates are more easily understood.
Many other commands can be executed on these files by using the image
extension value [1]-[4] for nosplit mode, [1]-[8] for split mode (so rare,
you'll never see it).
Help can be found in the TDC web page
in its "Data Analysis Software" section.
Click on saoimage's Color menu button and you will
enable the lookup table, altered
by holding a mouse key down and then moving the mouse.
The most useful iraf packages for analyzing your image are imexamine
or mscexamine
which place a cross shaped cursor on the image, allowing line and
column plots (l or c keys),
and radial profile plots of stars (r key).
These graphs will come up in a separate graphics window. Use
q to exit imexamine. The implot package also comes in handy.
If for some reason another saoimage, ds9 or
ximtool is still running, IRAF will not display in the new one.
If you suspect this has occurred, as evidenced by
display not doing
anything, go to the main login window and type ps auxw |grep -i
saoimage, ps auxw |grep -i ximtool or ps auxw |grep -i
ds9. Kill any processes named saoimage, ds9 or
ximtool with command kill -9 procnumber, then try
simtool, dimtool or ximtool again. If it won't
let you kill them (not owner), use godown to reboot.
Hardcopies can be made by going to the etc menu, and clicking
on print.
It is possible to do the necessary debiasing and flatfielding
of the 4shooter CCD data in IRAF. The package
usually needed to do this is
mscred
Miscellaneous
The Rtshell window has an extensive help command, describing
all of the commands listed above, plus those dealing with
driftscanning, changing the readout pattern of the CCD and
other things.
Several aliases have been written which readout the chip in
popular ways; execute them in the Rtshell window:
- ccd2048 - (size = 2048x2048 = full res) alias ``large''
- ccd2048c - (full res, but only reads central 1024x1024; this
speeds up the readout)
- ccd1024 - (2x2 binning) alias ``small''
- ccd512 - (4x4 binning)
- ccd512c - (2x2 binning, but only read out central 512x512)
- ccd256 - (8x8 binning)
- ccd128 - (16x16 binning)
These last two are readout very fast, good for snapshots of fields.